


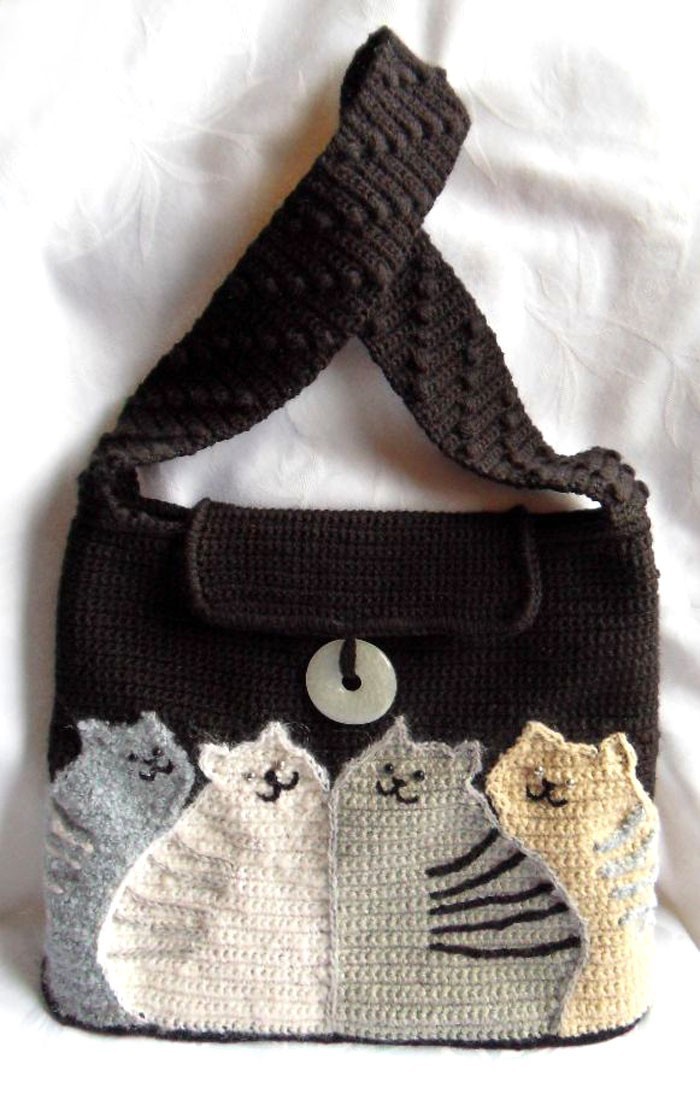
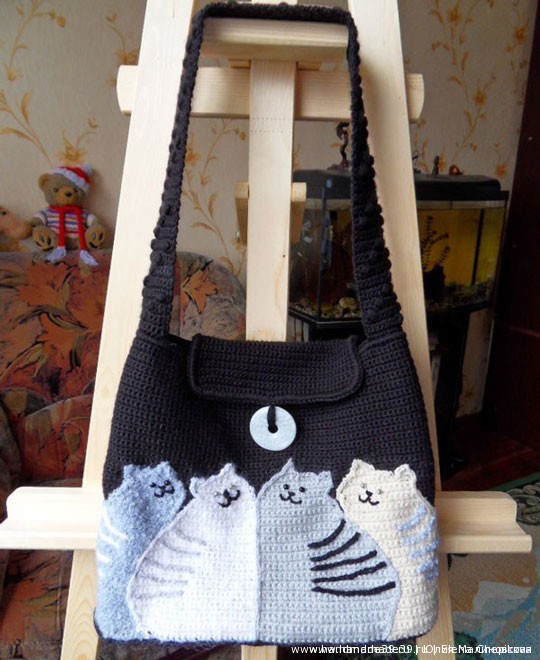
Вязанная крючком сумка «Коты». Такой стильный аксессуар станет оригинальным дополнением к костюму и наверняка выделит вас из толпы, потому что у кошек огромная армия поклонников.
Идея не моя. Изначально схема и описание похожего рисунка были напечатаны в японском журнале. Позже появились переводы, хотя и с иероглифами можно было понять принцип вязания сумки и узор. В Интернете встречаются похожие сумки, но почти каждая мастерица внесла что-то своё, индивидуальное.
Knitted bag “Cats”, Workshop on English
Stylish crocheted bag. This accessory will be an original addition to your look, and certainly set you apart from the crowd, because cats have a huge army of fans.
The idea is not mine. Originally, the design chart and description of a similar pattern were printed in a Japanese magazine. Later, there were translations, albeit one could understand the principle of knitting of the bag and pattern even from the hieroglyphs. There are similar bags on the Internet, but almost every craftswoman has brought something of her own, individual.
Let me present an author’s version of the «cat» bag. This is a crocheted item. (You can knit with spokes as well).
Materials: black yarn «YarnArt» (ELITE) 100% acrylic, 100 g = 300 m (it took a little more than a skein), gray yarn of two different shades, white yarn of two different shades (I used remnants of yarn, a large ball of each).
Attention! All the yarn should be about the same thickness, otherwise it will not give a smooth surface, and there will be strains and distortions!
Additional materials: 8 black beads for eyes, a large white button or decorative ring («moon»), black fabric lining, plastic to strengthen the bottom.
Description (master class):
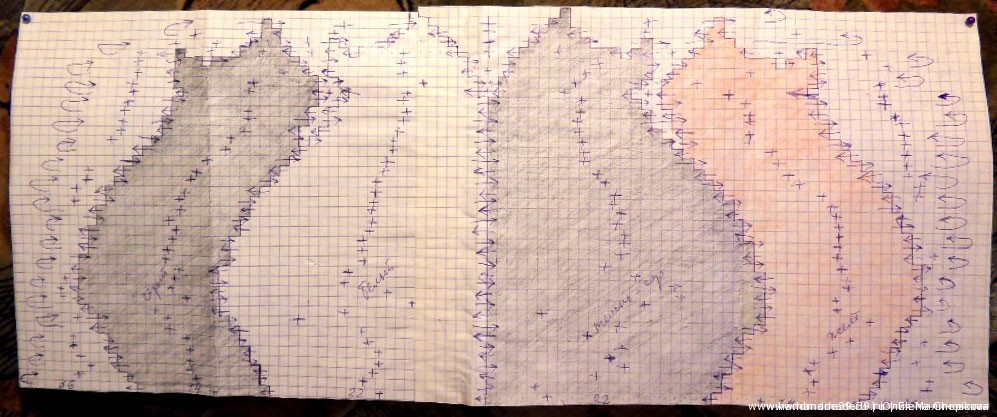
1. Draw the chart. Draw cats in a checkered notebook sheet.
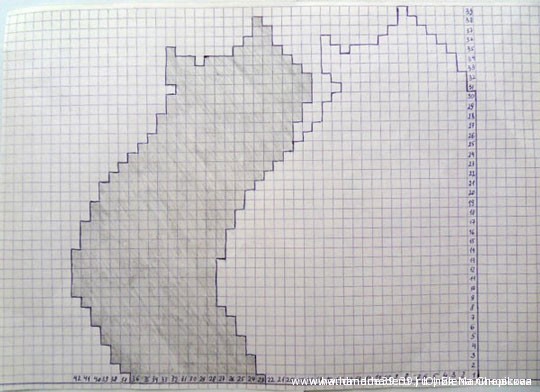
2. Glue the whole chart of two halves (right side is a mirror image of the left).
Attention! The chart shows both facial and purl rows!
3. Getting started: knit a chain of 145 air loops with a black thread (144 base loops + 1 lift loop). It was the «zero» row.
Attention! Zero row is a PURL one, “working” so to speak. It is not marked on the chart. Turn.
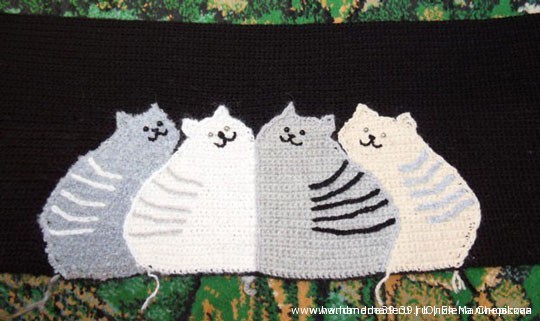
Then the whole fabric is knitted sc (single crotchet). The background color is black. All cats are different colors. Yarn of different texture looks particularly decorative, for example, the boucle yarn can be used for one of the cats. Do not forget that the yarn should be the same thickness. This is important!
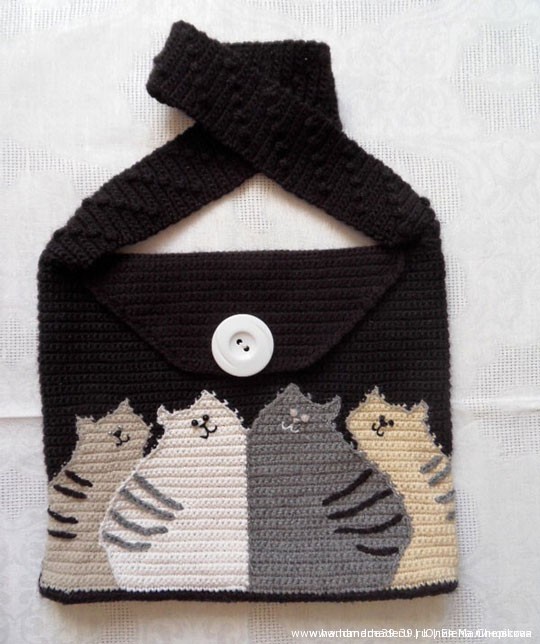
1st row (facial): 36 sc black, 14 sc yellow, 22 sc dark gray, 22 sc white, 14 sc light gray, 36 sc black (144 sc totally, this number will remain unchanged ). Turn.
2nd row (purl) and subsequent rows are knitted according to the chart.
The fabric is knitted using intarsia.
Intarsia is a technique of color fabric knitting, in which BOTH threads in the moment of color change are crisscrossed on the purl side of the fabric, and not floated as in the Jacquard technique. The «old» thread is temporarily not involved in the work, and the work is continued with the «new» thread. Often intarsia is knit on the spokes, but this technique is manageable with the crotchet too.
Jacquard technique in this case is inconvenient, because it makes too large floats.
Each color is a separate ball. In this work there will be 6 balls at the same time (black — yellow — dark gray — white — light gray — black). In the upper part of the chart, where the heads of cats are separated, there will be more black balls.
Tip: so that the threads of different balls are not entangled with each other, you can put each ball in a big plastic cup or container. Cups (containers, boxes, etc.) should be set in a row and connected together with a stapler. This design does not take a lot of space, it can be placed against the wall, and you nerves are a lot better!
4. Sides of the finished fabric are sewn together. The seam is located in the middle of the back side.
Bag can be made flat, and then the bottom should be sewn too. I recommend not to sew the bottom with a needle but rather to knit an sc row, catching both the front and rear walls at the same time with the crochet.
If you need a roomy bag, the bottom is knitted too.
Attention! In order not to err in size, knit the bottom only after the foundation of the bag is sewn on the sides.
Rectangular bottom option: knit a chain of air loops (al) with a black thread a little shorter than the front of the bag. The smaller the al chain, the more square will be the bottom. The closer the length of the al chain to the length of the bag, the more elongated (rectangular) will be the bottom. Then sc fabric is knitted. Do not forget about the 1 st lift loop at the beginning of each row. Apply knitted fabric to the «tube» of the bag (ie, knitted foundation) to determine when to finish knitting. I recommend using pins for fixation when fitting.
Elliptical bottom option: mentally divide the front wall of the bag (ie, the length of the bag) into 4 parts and knit chain of air loops 3/4 length of the bag. Next knit sc around it making gains on the edges according to the following chart:
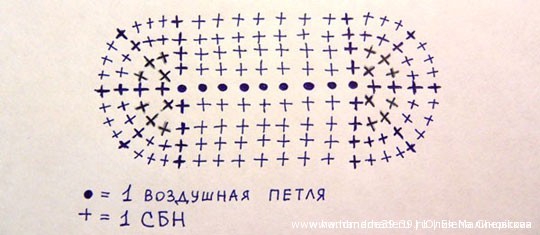
The bottom is sewn to the bag. You can tack the bottom to the bag and knit around with sc catching both the bottom and the wall of the bag with crotchet. This gives additional rigidity compound bag holds its shape better.
Attention! I recommend to strengthen the bottom of the bag with a piece of plastic (a folder is perfect).
5. The top of the bag is knitted with «crab stitch» (sc is knitted on the facial side in the opposite direction, ie from left to right). Option: knitted with conventional sc 1 time, then 1 more time over it.
6. The «Lid» (upper bar) is knitted of the required size using sc. You can knit it separately and sewn on. You can knit from the back wall. The “lid “can be easily positioned symmetrically aligning with the seam on the back.
7. Handle is knitted separately using the chart:
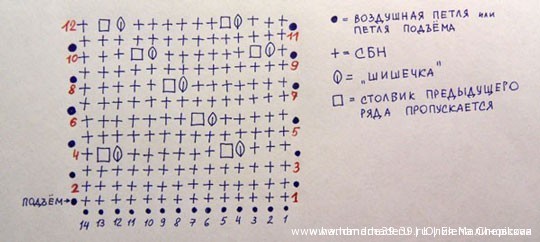
«Knobble»: enter the crotchet into the loop of the previous row, pull the loop do sc, pull loop back and make sc, once again pull the loop and make sc, once again pull the loop, and then throw the thread on the crotchet, float the loop through all the loops, again throw the thread on the crotchet and pull the thread through one loop on the crotchet.
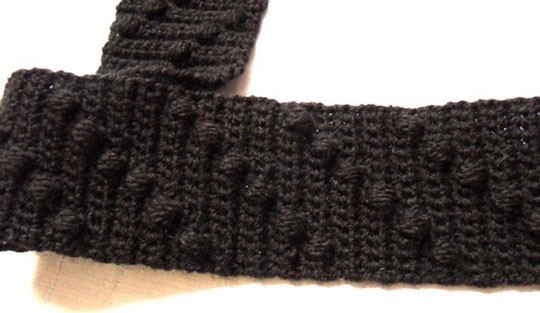
Sew the handle to the bag.
8. Sew the lining. You can make pockets for mobile phone and small things.
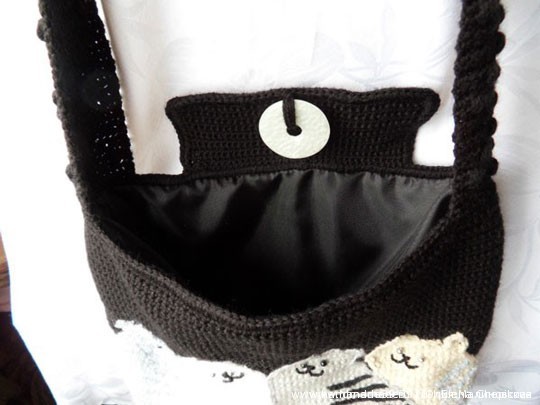
9. Attach decorative ring “moon” to the “lid”.
I hope this description will help craftswomen to create their original bags.
Elena Chepikova


Потрясающая работа! Спасибо за описание.
Галина, спасибо! Вяжите на радость себе и окружающим!
Елена, добрый день. Очень замечательная сумочка с котами у Вас получилась. Читала и захотелось самой связать такую. Но я бы связала, собственно буду её вязать чуть иначе. Делюсь с Вами своими соображениями по данному поводу. У Вас одно полотно которое сшивается одним швом и распологается по центру сумки сзади, а я думаю что, можно связать эту и любую другую сумочку без швов, по кругу. Рисунок от этого не изменяется, не портится и будет возможность сделать «отверстие» для внешнего карманчика на задней стороне сумочки. Я так вязала летнюю сумочку. Очень удобно и красиво получилось. Ну это мои соображения. А в целом… Читать далее »
Вера, спасибо за комментарий! Мне кажется особенно ценным вот такое творческое продолжение, развитие мастер-класса. Как замечательно, что рукоделие даёт нам возможность развиваться, быть творцами. Я давно не вязала сумок и буквально на днях поняла, что очень хочу затеять новый проект. Пока только идеи, но, надеюсь, смогу воплотить их в жизнь. Хочу чего-то яркого, летнего, позитивного.
Обе сумочки я вязала по кругу и у обеих сзади есть кармашек из подкладочного материала. Сами сумочки и карманчики на молниях. Теперь возьмусь за кошек ??
Нежно. Когда вяжешь однотонные вещи, очень важно выбрать правильный цвет, чтобы смотрелось не скучно. Вам это удалось. И зелень такая свежая, и кофейное сочетание красивое. Обязательно присылайте фото сумки с котами, когда закончите работу.
> Обязательно присылайте фото сумки с котами,
> когда закончите работу.
Лучше — публикуйте фото прямо в комментарии, используя кнопку загрузки изображений в правом нижнем углу.
For our English speaking guest:
Knitted bag “Cats”. Workshop on English is available at this link: https://handmade39.ru/2012/01/17/kotyi/2/
Recién descubro este sitio y estoy encantada! El bolso me parece precioso ya que adoro los gatos. Desde Argentina, muchas gracias por compartir tu talento!
Gracias por su atención a nuestro sitio! Tenemos una gran cantidad de productos con una imagen de los gatos. Como usted está en un móvil cubiertas del teléfono ? https://handmade39.ru/2012/01/21/chyornyiy-kot/
Hola, Rita Cristina!
Si no te habías dado cuenta, tenemos en la parte superior de la página web tienen un traductor automático:
Utilice, gracias!
Greetings from the USA. Thank you for this lovely pattern. I was wondering if I could put a zipper in the lining so that in addition to the close flap I have added security. Thank you for any information.
Привет из США. Спасибо за этот прекрасный узор . Мне было интересно, если я мог бы поставить молнию в подкладке , так что в дополнение к тесной лоскут , который я добавляю безопасности. Спасибо за любую информацию.
Greetings from Russia! Of course, you can put in a zipper. The only thing — you better fix it not to the lining but right to the knit back side. And then fix the lining 2-3 mm below the zipper
Hi,
Ilike it very much and I am going to try to make the basket.
When it’s ready I will show it!
Greetings from Holland
Willemien
Hi from Russia! 🙂
We are glad to welcome you on pages of our site, thanks for the comment! With great pleasure to look at your bag, let’s wait!
It’s beautiful! Congratulations on your creation!
Thanks for your comment!
классная сумочка! я просто без ума от кошек и давно мечтала о такой сумке! большое вам спасибо:))))
Спасибо за внимание к нашему сайту! По аналогии можно вывязать любой рисунок, распределив его на клеточки. Здесь Вашу фантазию практически ничто ограничить не может. Успехов!
Я потрясена! обязательно свяжу себе такую же. огромное спасибо)
Какая прелесть! Очаровательные котики! Возьму на заметку! У меня дочка кошатница та еще!